Create and Edit Tables
On-page build example
Note: when a table extends beyond the container/device width, the side-to-side scroll bar appears. Shrink your browser window or view it on a mobile device to see this functionality.
| This | Table | Example | Shows | Side | To | Side | Scrolling |
|---|---|---|---|---|---|---|---|
| a | b | c | d | e | f | g | h |
| 1 | 2 | 3 | 4 | 5 | 6 | 7 | 8 |
Visual demo
Widget standards
Do:
- Limit the number of columns to fit width comfortably.
- Ensure text is concise and clear.
- Adhere to website accessibility standards outlined in the playbook.
Do NOT:
- Use a table where another widget is better suited to display the content such as the CMU Events widget.
Written instructions
1. Open the page you'll be editing.
2. Click "Edit" on the Content Block Widget.

3. Navigate to the place in your content where you want to add a table.

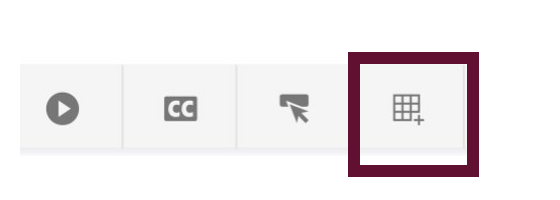
4. Click on the create a table icon in the toolbar. This will open up a collection of squares you can use to select how many rows and columns you want in your table.

5. Highlight the number of rows and columns you want in your table. Once you're done selecting, the system will generate a table.

6. Enter your information into your table.

7. Once the information is entered, click on the first cell in the first row and first column.

8. Click on the table wizard icon in the toolbar.

9. In the table wizard window, click on Accessibility.

10. Set the Headers Row to 1.

11. Click "Done."

12. Your table is now accessible. Click "Save."

1. Select the Create a Table button from the Content Block toolbar.
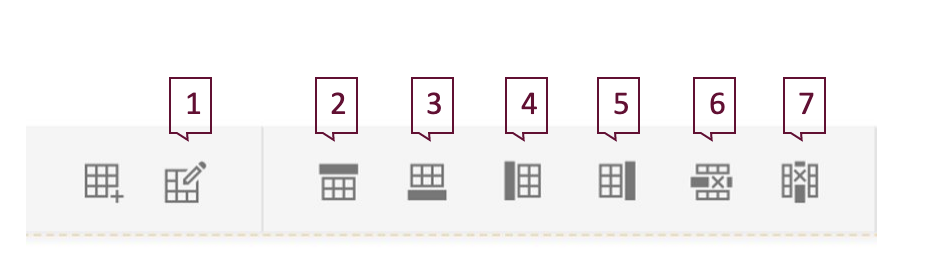
Edit a table
- Table Wizard: This button opens a new window where you can enter values directly rather than use the additional buttons in the toolbar to make adjustments. You can also modify things like: cell dimensions, alignment, background color, border style, and text wrapping.
- Add row above: Add a row to the top of the table or above the current row.
- Add row below: Add a row to the bottom of the table or below the current row.
- Add column on the left: Add a column to the left side of the table.
- Add column on the right: Add a column to the right side of the table.
- Delete row: Remove a row.
- Delete column: Remove a column.